Solo Stove Review

Solo Stove Review

This is a Solo Stove review submitted by a reader here on Modern Survival Blog. I too have one of these, and can attest to its unique attributes. It’s pretty amazing how fast you can boil water on the solo stove, simply with twigs for fuel… Okay, here’s the short solo stove review:

I came across a backpacking stove that burns twigs and sticks.

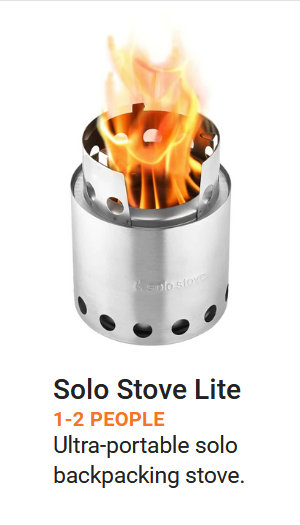
The stove is made and sold by Solo Stove. Here’s an example of their lite model.

Compact – Portable
(view on their amzn storefront)

I have several backpacking stoves. But they all need some kind of packed in fuel such as white gas, IsoButane, alcohol, etc.

I have run out of fuel many times, and ended up carrying a dead weight stove for miles, and trying to cook over a fire.

I liked the concept of the Solo Stove, so I ordered one. And today I tried it out.

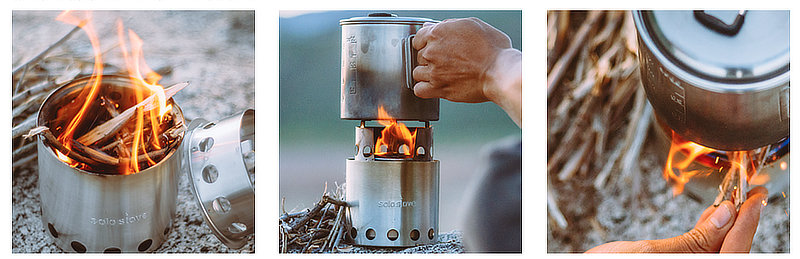
Solo Stove Sticks & Twigs for Fuel

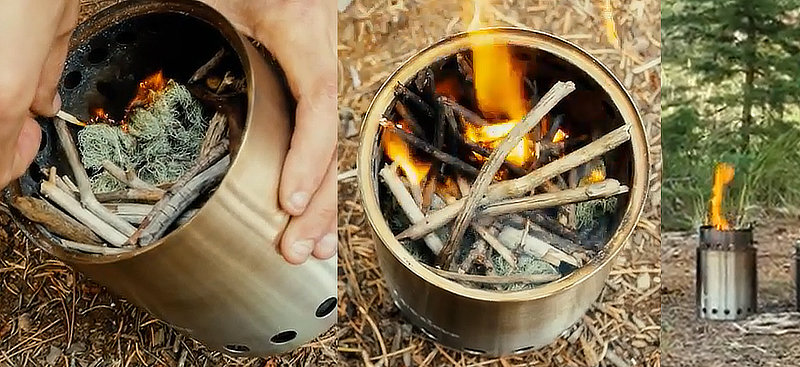
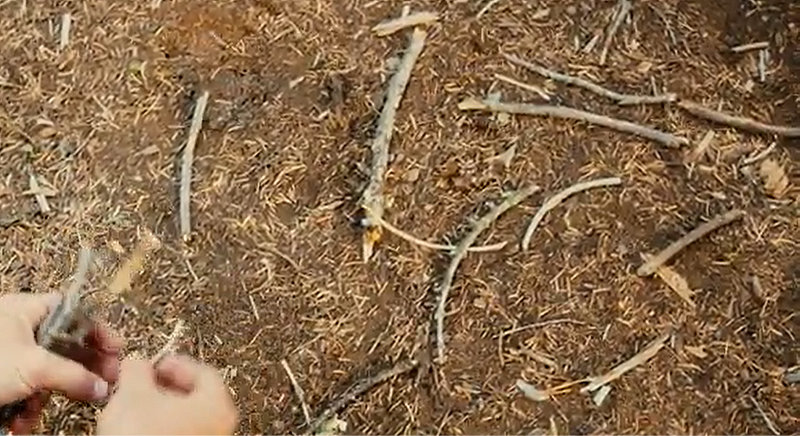
I gathered up a handful of small sticks and twigs. I split them up into pieces about 3″ long and set them next to the Solo Stove.

Then, I used a piece of folded paper towel and lit it with my firestarter. It took the spark on the first try and I scooped it into the fire chamber of the Solo Stove.

I immediately added a few small pieces of the twigs on top of the burning paper towel. They caught fire right away and all was well.

“After a minute or two, the inner air holes looked like jets of flame and I could tell that the stove was well-designed. I let the stoke build up a nice amount of coals (maybe 3 minutes?), then put the top ring in place. This is a good time to remind you to save a nice, small stick to use as a fire poker. The cut-out hole in the side is a fine size to add more twigs to keep things burning.”

lighting process from another Solo Stove review

“As for just this Solo Stove, I find being able to have a smokeless fire that doesn’t hurt the vegetation below it and efficiently burns from the smallest amount of organic materials (twigs, sticks, paper, leaves, etc) to be a huge selling point to the gasification design. I have had zero warping of the metal shell and it functions as good today over 150 uses later.”

said one Solos Stove reviewer

How long does it take to Boil Water on the Solo Stove?

So I placed a pot of cold tap water on top and started the timer.

After 3 minutes the water started to show the small bubbles that come before a boil.

Two minutes later (5 minutes, total) the bubbles were bigger and the water was hot enough for stuff like coffee, cocoa or tea.

Just before minute 6 rolled in, I had a rolling boil.

[ Read: How Long to Boil Drinking Water until Safe or Disinfected ]

How much Wood Fuel does the Solo Stove use?

The thing that amazed me most, was that even after maintaining the boil for a few more minutes (playing around) I still had half of my original wood fuel left!

The stove is very efficient, and very hot.

This thing is a fuel miser!!! Literally, the amount of twigs you could gather from just sitting on the ground would be enough to boil water in anything short of winter weather. I’d guess 10 minutes on the long side for icy stream water and 25 degree weather.

“The gasification process not only gets as much energy out of your twigs and such, but as an added bonus gives you a stealthy smokeless fire. The results after you use it, is the finest powdered ashes you have ever felt.”

from a Solo Stove review

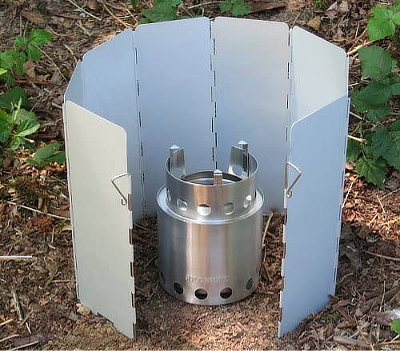
Windscreen for Solo Stove

What about using a solo stove in the wind? I use a windscreen with all of my stoves and will as well with this one. For the few ounces it weighs it makes the stove far more efficient. They can be made from any kind of fold-able or roll-able sheet metal, or bought online.

Windscreen
(amzn)

The Solo Stove is made of Stainless Steel

Now for the construction. The stove has no seams. Very strong extruded stainless steel. It has two moving parts. The stove, and the pot holder-upper. And the pot holder-upper turns over and nests into the stove body when it is not in use.

The picture above shows the Lite model stove with a pot on top (Pot 900). You can get this is a combo package. The pot holds up to 30 ounces of water.

Stove with Pot combo
(amzn)

Lightweight

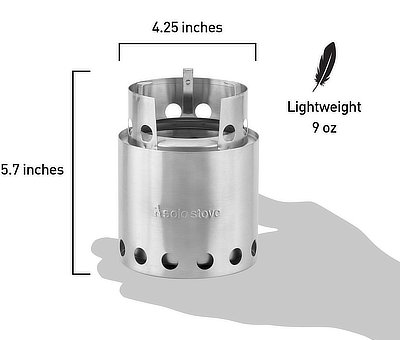
This stove is a must have for any backpacker who wants to save weight. It weights 9 ounces and is a “gear of the year” winner by Backpacker Magazine. It would also be great in your bug out gear, cars, and disaster stash.

Note: They do make different models of this stove. The Lite model is their smallest and lightest. Then there’s the Titan…

13 Comments

  1. How cool or hot! This is what the youngest son and family got for Christmas, bought us one also. However when I told Mr. how much it cost he said How Much? I do not expect good design stainless to be cheap. Need to get mine out and learn the drill. You can use alcohol burner inside the house with the inside safe fuel.
    Thanks for posting!

  2. In my emergency bag I have a solo stove. For fuel I purchased wood clothespins and removed the wire. The wood fits evenly in a waterproof bag. I figure rain or snow might make it difficult to find natural fuel.
    Stay frosty.

  3. SoulSurvivor
    Am I reading correctly — you cut out the bottom of the paint can and then also cut out a 1 1/2″ section of the bottom of the soup can?
    I’d like to make one.

    Friend made a “stove” from a washing machine drum. It has a metal stand to elevate it and a hinged grate that folds for transport. We use it when ice fishing. Haul it with snow machine…
    I made a smaller one from a 5 gallon metal bucket. Borrowing the fire grate and grill from a Webber (Smokey Joe?)

    When I ran sled dogs, used an alcohol stove made from a 5 gallon metal bucket. Using a 12 or (16?) quart stock pot to melt snow to feed the dogs and refill the thermos, etc.

    1. SoulSurvivor
      Thanks for the info. Next time in town, quart cans are on the shopping list.
      Progresso soup. Yup! Handy for a quick meal.
      Just tried it — the type of can opener that makes a triangular hole works for the top and bottom holes in the soup can. At least it makes nice rows of holes… Pliers can flatten the top hole points. The hole one inch up would still have to be drilled, or punched. Just happen to have a dozen or two assorted cans lying about. Ha! That Great Depression mentality, I guess.

    2. SoulSurvivor
      Looking at the soup can with its series of holes, got thinking, would it mess up how the stove works if you were to punch a series of tiny holes, in various patterns across the side of the soup can? The soup can could then do double duty as a candle lantern. An 18th Century style lantern. Maybe the hardware cloth, on the outside, to hold the candle in place, with a piece of foil to catch drips?

  4. We have two of the lite models, with the 900 pots. They take up very little room in our go bags in the cars.
    We also have starter pine slivers to get them started in bad weather.
    A reliable cooking source is very important in an emergency situation, water purification? Preparing a hot meal, perfect for those long term meals.
    Every other month we will try them out and make a meal, coffee,ect.
    They also have larger models, that make awesome fire pits. We have one that has a grate to cook on. Smokeless with a good heat output.

  5. I have made such stoves with discarded steel cans and other items that can be purchased from my local ACE hardware store. Knowing how to improvise such a set-up is a valuable skill set. Perhaps the handiest thing I bring with me camping is the grill from a Webber BBQ. (replacements can be purchased at ACE hardware as well)

  6. – SS,
    Reading your description of your homebuilt stove sounds like a stove I used years ago when I was in the Scouts. Worked okay, yours sounds like a slightly larger and improved version of the one I made back when. Thanks for the reminder; I will probably make one to replace the whisperlite knock-off I bought recently to use in place of the Esbit stove with the penny stove burner I have been carrying in my GHB. I remembered the other but not the pattern.

    – Papa S.

  7. SoulSurvivor
    Thank you for your kind words. I hope I can live up to them.
    Yes, I will use the hole sizes and spacing you have specified. I tried the can opener because my drill is out at the cabin and I wanted to start right away…

    There is a book, kind of sort of a kid’s book titled “The Golden book of Camping and Camp Crafts” I had a copy as a kid and have been looking into getting a used copy for my granddaughter. There is a section on tin can crafts.
    “Woodcraft and Camping” by Bernard S. Mason also has a chapter on tin-can crafts.

    As Calirefugee says, it is good information to have tucked away. Never know when it might come in handy.

    Back in the ’50’s, when my dad and I went eel fishing at night, we always brought along a (metal pail) smudge pot for the mosquitos. All related items.

  8. I was on the fence about getting a Solo stove but an opportunity to actually use one presented itself so, after reading the review I got one. It is very nicely made and seems sturdy. I also got the pot for it and the windscreen. It is so compact and the stove fits in the pot even in it’s own stuff sack. I can’t wait to try it out! I had considered one of the flat-folding stoves but I think this one will burn much more efficiently you don’t have to carry any fuel.

    1. Thanks for letting us know. Yes, this one is nice and small. Easier to pack. I have the Titan too, it’s bigger. Anyway, let us know how it goes after you’ve played around with it…

  9. I always like building things. I built a fire pit similar to their larger ones using a stainless washing machine drum. But in this case I got lazy and after reading this review ordered two of the Solo Lite units with the pots. I gotta say I like ’em. My test was to melt snow and bring to boil. I started a timer, set the stove up, cut and filled with twigs and lit it off. While it was coming up to temp I filled the pot with snow and kept filling as the snow melted until I mostly filled the pot with water. Once the last of the snow melted the water was already hot to the touch and about 5 minutes later, full boil. Total time from match light to boil, 25 minutes. It packs up nice in the pot with room for a load of twigs preloaded into the stove. Its cool to watch those secondary burn jets light off once its hot. No smoke to speak of and quite a lot of heat from a little quart can.

Comments are closed.