Raised Garden Beds – Tutorial
The advantages of a raised garden bed include the ability to plant in any location or areas of your yard that were not possible before – they’re a great way to plant when you don’t have the proper soil (just mix your own soil & compost) – they are easier for weed maintenance – the option of adding wire mesh on the bottom to keep burrowing critters out – simpler to control watering – better drainage – a bit easier on your back…
Here’s how to make your own raised garden bed:
Guest post by: Tammy
MATERIALS & SUPPLIES for making your raised garden beds
Makes (2) 4′ x 8′ x 12″ Raised Beds
(6) 2″ x 12″ X 8′ Boards
(1) 4′ x 25′ Hardware Cloth, there will be some left over
(1) Box 3″-4″ Deck Screws
(16) screws between 1″ and 1 ½” long (these can be any odd assortment, just used for attaching straps to sides)
(1) Roll Galvanized Strap w/holes
(1) LB. U-shaped Nails, any size (you don’t want huge ones though)
Drill with Philips bit & drill bit for pre-drilling screw holes
Hammer
Needle nose pliers
Tin snips or similar for cutting hardware cloth
Heavy gloves
Safety glasses
Instructions
I already had the strapping and u-shaped nails. The rest cost approximately $140.
I tried using my battery operated screwdriver on another raised bed I built. Don’t make that mistake. Use a real drill.
The needle nose pliers are used to hold the u-shaped nail in place to hammer it, saves a lot of smashed fingertips.
The last beds I built, about 7 years ago, the hardware cloth cost about $30, now it’s up to $67. I feel it’s THE most important part, and here’s why: You may or may not have burrowing critters in your yard right now, but in a SHTF you may end up getting an influx of animals looking for food. You won’t be willing or able to share even one plant with them. One gopher getting in your raised bed can decimate your plantings in ONE day!
About the wood: I use untreated fir, and my reasoning is that I live in a very dry area and even untreated wood lasts for decades. In a wetter area treated wood may make sense. I don’t use Redwood, which is what every book will tell you to use for it’s natural longevity. I’m not a tree hugger, but I believe there are certain things on this planet that should be left the hell alone.
When cutting or handling hardware cloth, please use heavy gloves, it will tear you up otherwise.
This is the lumber I chose for this project:

I had two of the 8′ boards cut in half at the lumber yard just so I wouldn’t have to do it, so I wind up with 4-8′ boards and 4-4′ boards. Long ones are sides, short ones are ends.
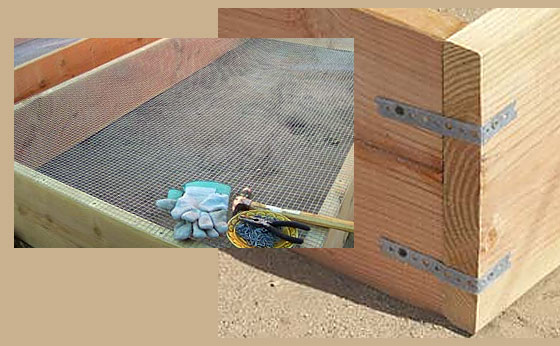
The next photo shows a close-up of how I joined the corners. I use the galvanized strapping with holes as reinforcement so that over time the wood can’t warp so much that it causes leaks. You don’t want water draining out a crack before it has a chance to soak into your soil. (Later on if it seems to be separating, you can add another strap where needed, I’ve never had to, but you can).
Use the long screws to join wood together, the shorter screws to attach the strap to the side.

After you get the frames all put together, take the roll of hardware cloth and put it on top of the wood at one end. Attach the end of the wire at only those two corners using the u-shaped nails, making sure it is as straight as you can get it. Then unroll the wire along the top of the frame and let it hang off the other end.
Starting at the end you tacked down, start putting in a u-shaped nail about every 6-8″ (closer if you can get your finger between the wire and the wood, that’s all the gap needed for a rodent to squeeze through). Stop at about 2 feet from the other end so you have some room for cutting off the excess wire. I don’t try to unroll the hardware cloth and flatten it then measure and cut and all that, it’s just too unwieldy. It works better to tack it down and let the end that’s hanging off hold it in place for you.
Now cut off the roll along the edge of the wood, and nail that end down.
They’re done!


Now just flip them over, place in a spot that gets as much sun as possible, and fill with compost or mulch. You can buy these in bulk and it will cost a whole lot less than bagged soils. Or if you have a huge supply of compost like I do just use that. My brother’s family and mine share a mountain of compost we make cooperatively each year.
These two beds that I just finished will be used for raspberry vines, grape vines and 4 more fruit trees. I might add strawberry plants between the trees. You might not think you could plant trees in such shallow beds, but in reality, most fruit trees have the biggest majority of their roots in the top 2 feet of soil, they don’t have tap roots the way nut trees or other large trees have. I buy semi-dwarf fruit trees because they can produce just as much fruit as a standard tree but won’t get nearly as large, making it a lot easier to harvest. Plus you can fit more trees in a limited space, and they take fewer years to mature. Dwarf trees are too small to give much fruit and I consider those to be more decorative than food producing.
Here is a photo of the first two beds I built at this house. There are 4 trees, peach, apricot, apple and mulberry, a lilac bush, a rose bush, watermelons, squash, about 12 kinds of herbs, cucumbers, wildflowers, marigolds, eggplant, swiss chard, sweet bell peppers, anaheim chiles, and my 2 raspberry bushes are living here until their new place is ready. (There may be other stuff in there that I forgot)

