Cast Iron Cooking & Cookware Tips For The Beginner
Guest article by ‘Old Chevy – on a rustic road’
My intention for this article is to post a few tips for the cast iron cook wanna-bee. This is for beginners, or for those who have only thought about using a Dutch Oven and are intimidated by trying something new.
Be assured that cast iron cooking is almost foolproof. There are a variety of recipes including pizza, chili, pies and breakfasts. But to start out, keep it simple and enjoy your success as you move up in confidence and experience.
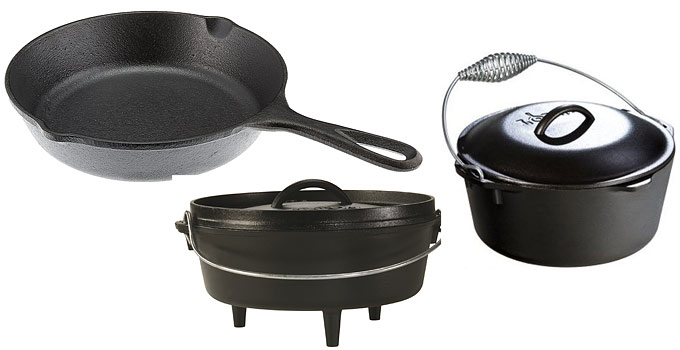
3 Primary Cast Iron Cookware Pieces
How we cook in cast iron using 3 different pieces of cast iron cookware:
– Stovetop Skillet (Check it out HERE)
– Stovetop Dutch Oven (See it HERE)
– Camp oven, also known as a legged Dutch Oven (Like THIS One)
The cooking procedure is identical for all cast iron cookware in this article.
I will only explain it for the skillet:
CAST IRON STOVETOP SKILLET
I place the skillet on the burner at a medium to low temperature.
I then add a little oil which I swish around with a basting brush (like these) but avoid having a puddle. (Truthfully I use my finger, but I do it before the heat is on and don’t tell anyone).
I always start with oil. If I want to use butter I will add that later after the food is in the pan so it doesn’t burn.
[ Ken adds: I asked him about his preferred oil: “I only use olive oil when sautéing onions, peppers and the like on low heat in a skillet. Otherwise I use a lighter oil, like grapeseed oil in all other situations in all cookware pieces.” ]
The skillet is heated up until the handle is warm but not so hot you can’t touch it. If you don’t heat it up first, the food will get welded to the pan and you will have a very difficult skillet to clean. I learned this the hard way when I placed a lean venison steak into a cold pan with oil and left the room as it heated up. When it was time to flip it over I had to extract it with a pair of pliers.
Heating up empty cast iron won’t hurt it, in fact that is how it is seasoned; another topic for another time.
So regardless of what goes into the utensil, I always have a film of oil in it, even with something like bacon. I turn down the heat on the skillet for over-easy eggs and turn off the burner right before I flip it. Leave it in the pan until I have the bagel buttered.
My wife has a technique down for hash browns from fresh potatoes that I have not been able to master. She has them on a higher heat but somehow does the onions without them burning. I don’t know how she does it. It’s the only secret that I let her keep, and I believe it is the only one she’s got, or so I’m told.
CAST IRON STOVETOP DUTCH OVEN
The stovetop DO (Dutch Oven) in our house is primarily for doing stews, roast beef, simmering on the burner for hours.
Like the skillet, it is oiled first. The meat, onions, can be braised, sautéed before adding the other ingredients.
With the tight-fitting heavy lid there is a slight pressure-cooking effect. And the entire mass of cast iron heats up the ingredients and guarantees to finish perfectly.
It almost takes an effort to ruin something in a Dutch Oven, although we often use a trivet to prevent burning or to keep the bottom layer of food from getting too soggy if there is a concern (here’s a nice one from Lodge).
On an electric stovetop if there is a concern of burning, the cookware can be placed on top of a metal plate, griddle.
We also avoid using tomatoes in cast iron. We have a porcelain version for such recipes. The exception would be chili recipes in the camp oven, which is next.
Check it out:


CAST IRON CAMP OVEN
The camp oven, though similar to the stovetop DO, has significant differences and advantages. It perches above the coals on 3 legs and has a rimmed top for placement of coals for top-down heat. This makes for nice crispy, browned food impossible in the stovetop DO.
We use our camp oven when we go camping and prepare a meal to cook while we are out hiking. Get the coals going before you head out. Then load up the ingredients. When you come back from the trail you will have a hot, delicious meal ready to eat. As we have often left camp under sunny skies to come back in a rain I suggest keeping the oven covered by some MacGyver method, a tarp perhaps high enough to not melt.
Another wonderful aspect of the camp oven is that when set out in the sun for an hour or so it will get so hot that you won’t be able to touch it without using oven/grill gloves. This means a head start on warming it up and means less charcoal.
And there is another advantage; it can use free fuel source with chunks of wood. I’ve used pellets also, but charcoal is the easiest to use and to gauge heat levels. There are charts for so many heat units per briquet, which I take as a suggestion. I prefer the peek and probe method of determining doneness.
A wonderful quality of cast iron is that it keeps the food cooking after the coals are out and will stay warm for 2nd helpings long after it has been removed from the heat.
I used a large pan underneath the oven to contain and focus the heat of the coals but I have found out they don’t burn well due to a lack of air flow.
I start the coals in a chimney starter placed on top of the lid. When they are ready I dump all of them on the lid. With a pair of grill tongs set approximately half as many under the oven as are on the lid.
Recently I’ve set the briquets on top of 1/4″ wire mesh so that I can shake out the ashes and retain the burning coals. The mesh also increases air flow.
Roast A Chicken In Cast Iron Cookware
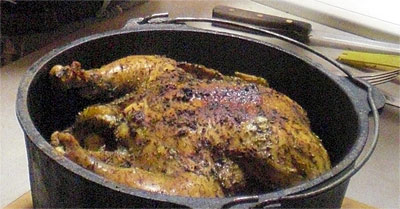
Most recently we had a very large chicken, 5.5 lbs, that was too big to fit into our countertop rotisserie. So it went into the camp oven. In a 4 quart DO I first placed the trivet, russet potatoes (cut in half layered on the bottom) and the chicken on top. Lots of briquets went on the lid, some underneath, and it cooked for several hours. An occasional peek and probe into the dense joint area with a meat thermometer until it is was finally declared done. The skin under the briquet-layered lid was crispy and juicy. The meat itself developed a rich flavor and tenderness unequaled by any other method I’ve tasted. The only mistake possible would’ve been to have taken it off too early. It won’t overcook as long as the last briquets were placed halfway through the cook time; like 45 to 60 minutes before.
CLEANING A VERY DIRTY GREASY CAST IRON LID
Finally one last tip on cleaning a very dirty greasy lid. As you should know, do not use soap on bare cast iron cookware as the soap fragrance embeds into the seasoning and then into your food. Recently I had a lid that was coated in a very thick grease that just wouldn’t come off. I got it as clean as it has ever been by turning it upside down and filling it with HEET and lighting it on fire. After that the lid was filled with sand and scoured it. Finally it was rinsed off in hot water with no residue of any sort. If you try this be very careful as the flame is huge and is invisible.
CAST IRON COOKWARE PREFERENCE
My own preference in cast iron is the Lodge brand (here’s their lineup). In spite of the criticism of the rough casting, it is the best choice for beginners to avoid the laborious seasoning task. Older pieces, like the one passed down to me through the generations, is glass smooth and is preferable (but you can’t always get what you want). I prefer the 5 quart Lodge DO with handle for our stovetop oven.
The history of the oven goes back to unknown origins.
I should like to read this book someday:
Dutch Ovens Chronicled: Their Use in the United States
Have at it!!
– Old Chevy – on a rustic road