The ‘Israeli Bandage’ is highly recommended for First Aid Kit trauma preparedness.
It has a large sterile non-adherent pad surface to cover the wound, and is attached to a length of elasticized material (like an ‘ACE’ bandage).
It uniquely wraps to a hemorrhaging wound with a built-in pressure applicator.
The device can potentially save life between time of incident to urgent care…
(UPDATED) It’s one thing to have the Israeli Bandage, however,
– Know what it looks like after being removed from its vacuum sealed packaging
– Know how to use it (it’s easy, but you should see it ahead of time)
Here’s more information and how to use it:
(Check it out here) Compression Bandage, 6 Inch
About the Israeli Bandage:
The emergency bandage was developed in Israel in 1984 by Bernard Bar-Natan, who was in training to become a military medic. Eventually during 1991 the idea and the design were developed enough to receive a government support grant which eventually led to the first bandages being sold in 1998. Today the company produces 1.5 to 2 million bandages a year.
While the Israeli Bandage is used by the United States and International military units, the bandage is also used by EMS, Industrial, and Hospital arenas. The emergency bandage is a great addition with a personal First Aid Kit at home, in the vehicle, or in any E-kit while in an environment which may risk traumatic injury.
Unique Features Of The Israeli Bandage
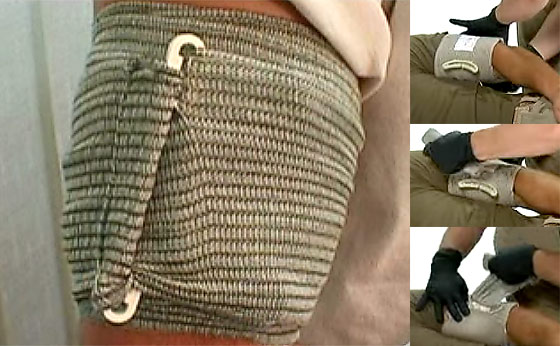
1. Sterile non-adhering dressing allows removal without reopening wound.
2. Pressure Applicator (a pressure bar) aligns over the wound to help stop the bleeding.
3. Closure Bar to secure the bandage after it’s wrapped and to apply additional pressure.
Video How To Use The Israeli Bandage
One way to learn how to use it is to simply watch it being applied. I found a very informative YouTube video which shows the process and various uses.
Israeli Bandage INSTRUCTIONS
1. Open the outer package by ripping open at any corner ‘notch’.
2. Remove the bandage from the clear inner-wrap by ripping its center ‘notch’.
3. Unfold to expose the bandage, one hand holding the end, other hand holding the ‘wrap’ roll.
4. Place bandage over wound with the ‘pressure applicator’ offset to the side of the wound.
5. Wrap one revolution of the elasticized fabric, then insert in/through the ‘pressure applicator’ and begin wrapping in the opposite direction – tightening as you go…
6. When fully wrapped, insert ends of the ‘closure bar’ into the wrapped fabric to hold in place.
(Check it out here) Compression Bandage, 4 Inch
Tip: While the Israeli Bandage is very effective at stopping/minimizing traumatic wound bleeding (by applying pressure), a ‘QuikClot’ sponge in conjunction with the Israeli Bandage is a great lifesaving combination.
May be something well worthwhile having in that ATV kit huh?
Ever been out riding in the forest and have a tree branch “reach out and stab ya”.
And at $9.15 on Amazon, that’s cheap insurance to have in all of the “E-Kits” no????
NRP
have several in my GHB.
don’t leave home w/o them
Have one in our primary medical bag.
Thanks for the video, Ken. It does make a difference, being able to see it used for some different wounds including the under and around head wrap and adding another pad inside to cover both sides of an in-and-out wound. Very helpful!
Thanks for the video. It really explained the proper way to use the Israeli bandage.
I have found the 6″ dressings fit rather well into the AR magazine molle pouches.
Ken, Thanks for the video. I am familiar on how they work, but did not realize they come in different sizes and with a 2nd bandage. Again I have learned something new from this site.
Time to go shopping. These are a must have for every 1st aid kit. You should actually have several. Better safe than sorry.
Adapt and Overcome.
I also have these in storage. I did read how to use it and it was a bit confusing. The video is much better.
good video,thanks. I’m not good at reading instructions but watching someone using it is great.
Thanks for the Re-Post of the article.
Like many skills we know or should know, it’s good to revisit most when ‘hopefully’ we don’t have the need for them every day/week/month.
1.5 to 2 million produced per year huh? Dang.
A question for ya, what ever happened to the Series on “Levels of Preparedness’?
You know I would ask again. :-)
I have been a paramedic since 1979. The israeli bandage is a great tool. I highly recommend them. Don’t however, think you have to have one to accomplish the task, stop the bleeding. You can accomplish the same thing with
(1) direct pressure. Place a hopefully sterile, at least clean, 4×4 or other type bandage directly on the wound and apply pressure. If it gets soaked with blood, add another bandage. Don’t take the bandage off.
(2) elevate. Use gravity to your advantage. Try to get the wound higher than the level of your heart. The blood pressure at the wound will be incrementally less. Helps with clotting.
(3) pressure points. A little more complicated here but basically find a pulse point which is closer to your heart than the wound. For example: A wound to your hand could be controlled by applying pressure on the artery feeding the wound. The brachial artery on the inside of your elbow, for example. You can find the pulse there now if you feel for it. It is at the antecubital fossa, you know, where they take blood.
If those things do not control the bleeding then a turniquet is the next option, but there are hazards associated with the use of turniquets. Learn these hazards. If ya don’t know what you’re doing you can cause the loss of a limb by inappropriately cutting off all blood flow for extended periods of time.
Good article!
Good item to have, along with Quickclot in the range bag for just in case. R.A.T.S good item as well, especially if out and about by yourself.
Have number of the different sizes and always QuickClot in my medical pack. Also have feminine pads and Kotex lady’s application units. Believe the plastic applicator would not hurt as much as a cardboard one for plugging bullet holes. In a fire fight you are going to work fast and get back as soon as you can to the party. Were do I keep my medical pack? In my truck on long runs, at the range anytime I’m shooting and any training op. Range bag, medical pack and always at the least soft body armor to go to the range.
Bought one and it took forever to get here from Israel. Is there anywhere to purchase in the USA?Thanks for the video.
Mrs. U…, check out the military surplus stores.
MrsUSMCBG
Amazon,,,, thats where i got mine
Excellent information , I have several of these and this was an easy video to follow, thank’s again.
Picked up 5 of the river site
I have to say, as a firefighter/EMT, I have been trained to use this and it works well. My advice: this is NOT like most bandages you see or use. Buy two. Open one and practice with it. The first time you actually have to use it is not the time to read instructions. In the training I have been to for tactical casualty care, we used a foam roller that is about the size of a leg. These are commonly used for exercise classes. The foam roller works well for tourniquet practice too. You can use a real person to practice on but be careful about cutting off circulation! As with any other gear, if you don’t practice with it, it can be useless.