Pantry Can Organizer – Canned Food – FIFO Rack

A Can Organizer. A stackable canned goods organizer for the kitchen or pantry. They’re great for organizing and seeing what you’ve got! And for proper canned food rotation – first in, first out (FIFO).
Being a preparedness site, a primary focus is food and food storage. Among the many varieties of stored food are ordinary cans or canned food from the grocery store.
One of the problems with storing more than just a few cans of food is how to store them best. So that they can be seen without reaching and tipping over a stack! Seeing and knowing what you have!
Pantry Can Organizer | Most Well Reviewed
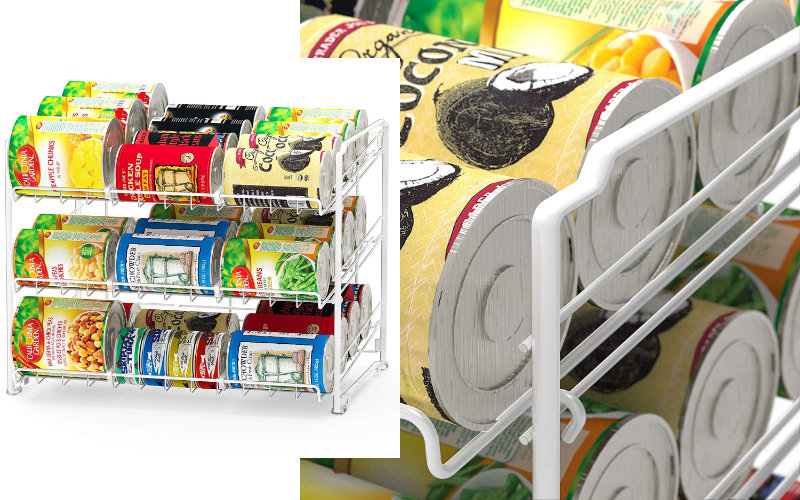
I always (usually) do a little research before I buy something. For instance, out of curiosity I checked on amzn to see which one is the most popular and best reviewed. Well, it’s this one:
Store up to 36 Cans
(same one as pictured above)
- adjustable dividers for different size cans
- 17″ wide | 13.5″ tall | 13″ deep
- stackable design (one organizer on top of another)
FIFO | First in, First out | Can Organizer
Actually, it’s a can dispenser. Some designs allow a can to be fed on top. Then it rolls down to the bottom (or next position).
In this way, the first can that you put in, will be the first can out. Reducing the chance that you’ll have an old can that never gets used.
FIFO might not be important, depending on your own methods of organizing cans. But if first-in, first-out is what you want, here’s a few to check out:

12 standard size 12 oz cans
(view on amzn)
Another popular can organizer:

Other Ways to Organize Cans for Pantry
Stack Them
Most people simply stack their cans as best they can. If you do, here’s what I suggest:
For stacks of cans that are the same (e.g. cans of carrots). Organize them so that you always take from the right or the front. When you add replacement cans, put them on the left or in the back. Slide the cans over as necessary.
The challenge is keeping the cans from falling over.
Tip: Place a smooth board on top of cans to enable another stacked layer. You might cut some plywood (or whatever) to fit the can space you’re stacking. Only problem is accessing cans on the bottom. But it’s a thought.
Bins
Sometimes you just don’t have enough shelf space or cupboard space. So what do you do? Keep your cans together by putting them in bins. Heavy duty bins will enable stacking.
Cases of Cans
There’s a particular discount grocery store about half-an-hour away. Sometimes we make the trip to shop (there’s a Walmart there too). We will load up on cases of food cans for things we eat. When you get them in cases (typically 12) it’s easy to just stack them at home.
How Do I Organize My Cans?
How do I do it? All of the above!
My can organizer system is a combination of cans on shelves, can organizer racks, and some are in boxes and bins.
Mrs.J keeps cans of food organized by their type. I suppose everyone does. At least you know where to look when you need something…
I purchased heavy duty shelf units from Home Depot (free standing). They have heavy duty metal frames and heavy wood shelves. We keep our ‘home canned’ foods on them as well as some of our regular grocery store cans too. Oh, and the #10 cans are stacked there too.
How Do YOU Organize your Cans?
Organization for your deep pantry. Know what you have back there! Eat canned foods before their expiration date (best-by or sell-by date).
Continue reading:
Food Storage 101 | Date & Rotate
Our home canned quarts and pints are on wooden shelving .The shelves are OSB ,1/2″ by 16″ deep and length varies with the room . Wood framing is 2″x3″x8′ bought at Home Depot.The distance between shelves will allow 2 quarts high or 3 pints high. We put 5 gallon buckets on an OSB strip on the cement floor which gives us 3 shelves for canned food .We put almost all jars back in the cardboard box they came in with a strip of 2″ packing tape around the whole box for strength and name & date a piece of masking tape on the box front.
Store canned items we store on similar shelves by stacking in the case when possible. We use cardboard between layers if we don’t have a box. We keep things sorted by categories.
We inventory and rotate twice a year as we like the FIFO system. This has worked for us quite well over the years.
I generally buy my LTS (20 years +) food in #10 cans by the case. Stacked on plastic shelf section on concrete floor. Little bit of space between the stacks for air circulation.
We use totes (everything in tote has the same expiration year)then stored in a closet. Keep about 4 to 6 cans of an item in cupboard then replace when 1 or 2 cans left that way if someone is “looking in cupboards they are not overflowing
Have one shelf for stuff that is close to or just past date try to plan meals around that stuff
Anyone who has built up their LTS will find themselves attempting to reorganize as their original space appears to approach max capacity. We well utilized the heavy duty storage shelving and, at first, stacked cases of store bought cans with loose cans on top. However, I found it was more difficult to visually inspect numbers at a glance without tipping and moving cans.. Last year I added several of these units shown that hold 12 cans…and I love them. They are easy to manage and I can place them on top of unopened cases of many products I use. Odd shaped cans continue to be housed in stackable 5 sided bins. I used the 36 can unit you show for my smaller cans, like the evaporated and condensed milk cans. Another one houses the smaller tomatoes sauce and paste cans.
I will always have a combination of store canned goods and home canned goods and these units help me keep better track of the store bought canned goods. The home canned goods remain in the original boxes labeled using duct tape around the box.
Another excellent topic Ken!
I have a bakers rack in my basement for my deep pantry. I took empty fridge packs (you know, the boxes that hold 12 cans of coke) and use them to organize cans. They’re basically free. Because visual cohesiveness is important to me, I covered each box in brown paper. I used my label maker to mark each box. It’s easy to put the cans that expire first in front, and add newer cans. It’s easy to recognize which cans need to be restocked.
My living can storage is a shelf structure made entirely out of 2×12 #2 pine except the back which is Masonite. Each is just wide enough to use a 4×8 sheet.
Every shelf is a height designed for a specific can size or jar size plus half an inch, except the bottom which is 13″ tall.
Most shelves are severely overbuilt. However, no matter what, they will not sag as compared to 1x.
I tried framed 7/16″ OSB and 7-ply plywood. Framing OSB wastes space and the plywood eventually drooped. I have one I built out of steel angle but it is cost prohibitive to do that.
This design prevents me from wedging items on top of other items which then quickly makes it a PITA to use/rotate. The lack of significant depth prevents laziness because you can always get to the back easily to restock/rotate. For example you can only fit three quart jars deep.
I have a Velcro attached curtain that goes over it to keep out light.
The only canned in glass or canned in steel food I have found to be a problem is tomato, pasta, or beet based. Beets seem to deteriorate with light rapidly. Tamotoes, especially non-roma, appear to eat steel after 5+ years. Not sure what the new non-BPA cans will do as they haven’t aged yet.
I do not rotate the truly long term food storage that is in cans/glass. Not really worth the effort. Have eaten some really old stuff and it has always been fine. More worried about things in plastic.
Have some sugar and cocoa in long term storage that is 5+ years old. Not sure how the cocoa will fare.
pinky,
Nice! Sounds like you’ve got it together nicely.
The description of your DIY can organizer shelves brings back memories when I was building pantry shelves for the home we had bought in California shortly after we moved there in the late 90’s (we’re not there anymore). The issue I had was EARTHQUAKES! I needed to build pantry shelves that would keep the cans from falling out during a earthquake.
While there’s nothing I could do regarding “the big one” (fortunately didn’t happen!), it certainly was an over-Engineering project ;)
I never thought of earthquakes!
I actually have mine fastened to the wall also. I’m 99% sure my own stupidity is going to kill me someday so I try to hedge against it. Don’t want my obituary to say “Stu Pidiot was died in his home pinned to the floor by 1000 cans of beans dated 1996. ”
I also have a piece of 1/8″ by 1″ steel screwed to the front of each shelf such that they stick up 1/4″ past flush so things can’t slide off. Again, due to hedging against my own stupidity of overfilling the shelf.
Maybe those two things would help in an earthquake. Not sure. Never researched earthquakeness.
Yep, earthquakes are a real treat,
Been hit by a few pretty good ones over the years, most memorable was in the late 60s i think it was, big Island of Hawaii, everything flew out of the cupboards onto the floor, and i mean everything.
This article got me thinking about how i could build an insert fot our pantry that was made of cabinet grade plywood.
For several reasons,
Anything made of wire or metal will be rusted and ugly in a short period, just the nature of living where we do, and because the cans rolling down the mechanism will inevitibly scratch or wear the coatings causing rust,
Another reason is cost, as in i cant see spending $ on something that i will be throwing away in a few years because its rusted, and those wire racks are not cheap, nor do they usually fit into a deep pantry cabinet and fully utilize the space.
So i came up with an idea to make a router jig, that basicly amounts to a series of gently inclined opposing slots cut into the plywood sides of the home made rack,
Our pantry is 25″ deep, so ripping a sheet of 3/4″ maple or birch ply in half makes the side pieces, i cut a sheet in half then cut a few sets of 10″ high x 24″ long pieces for the sides then drop the router jig onto it and using a guide bushing with my router can easily cut the slots and glue the whole thing up, then sand it and put a finish on it.
It is a bit more work, does take some skill but can be made to custom fit any cabinet you want to place it in or shelf unit, and could be made to support itself rather than needing a shelf to sit on if in a cabinet.
Not sure if anyone follows the design idea, but figured it might give somebody an idea.
One zig zag (2runs one in one back to front) should hold about 22 cans +/- depending on size of can.
Ok, enough of my blather lest i hit a nerve in some intolerant weeny
Kula-banger, REALLLY like your custom build idea for a pantry shelf! What you would create would save on the waste that takes place with the pre-made can organizers.
We organize cans by product and date, and we store oldest on the right, so we pull from the right side first. We don’t have any pre-made can organizers.
We have a Long Term Storage room downstairs and it is a 3-walled room (floor to ceiling). If we didn’t keep it organized, we’d be in trouble! lol
Our kitchen pantry holds some of our stored foods and it saves us from having to go LTS ‘shopping’ every day. The floor of our kitchen pantry holds our flour, sugar, grains, and legumes in large containers.
Our LTS 5-gallon buckets are in 2 rooms where I have my sewing studio. Those buckets are stacked in 2 corners, and also placed under several very long items (a quilting machine that’s about 10-feet long) and my work tables that are about 14-feet long. And there are some in our LTS food storage room, and here and there, like in our bedroom closets. Eccentricity knows no bounds… haha
Most home canned food sit in the Ball boxes because it helps with stacking and organizing. I put a masking tape label on the front of each box (for product and date canned). Most store-bought canned food are in commercial cardboard boxes for stacking and organizing, too. FD and DH #10 cans are double-stacked, 2 deep, or in their boxes (checked in and then re-sealed for storage).
We use heavy cardboard between each box of home canned foods to keep the weight off of the lids. We usually stack the boxes of store-bought canned foods as is since those cans are able to bear the weight easier.
Nooks and crannies get small jars of salt, beans for possible give-away, etc.
I got the drawings done and templates made, was trying to get a better system together because i buy canned veggies from costco and tomato paste etc and sometimes cases fall through the cracks so need a better setup
I made a can rotation device this past spring. Feeding it from the top.
It’s a heavy unit, so I had to better secure the wall studs.
Just some random left over wood material.
A 4×4 sheet of 1/4″ plywood.
1×4 board for 12 oz veggie/soup cans or doubled up tuna.
1×6 board for #10’s
Angle cut the one bys at at 45°
Tacked 1/4″ plywood on the 45° and at the front to prevent cans from rolling out.
Tacked 1/8 plywood on the frt of the one bys to secure the cans, but allowing a visual of the cans.
Seems to work well.
I think I counted 88 cans total