Sourdough Starter Recipe Without Yeast From Scratch
Here’s how to make a good sourdough starter from scratch and how to keep it alive (feeding it). No added yeast. Sourdough bread baking instructions.
Sourdough Starter Recipe
3 tablespoons whole rye or wheat flour.
Enough water to make what looks like a “thick pancake batter.”
Stir to mix and let it sit out, loosely covered, for 24 hours.
Then take (1/4 cup) of the sourdough starter, discarding the rest, and mix it with (1/4 cup) of water and (3/8 cup) of flour.
Repeat this process every 12 hours for 4 to 6 days. By the time it’s obviously alive (slightly bubbly and smelling distinctly acidic) you’ll have succeeded in creating a levain.
You can jump straight to baking (from room temperature) in the section below with this the new starter or store in the refrigerator until you’re ready to bake.
Prepare Sourdough Starter For Baking
Next, prepare your culture for baking:
From Refrigerated Starter
Start 24 hours ahead if you’re using a refrigerated starter. Why? Because you’ll need to wake it up and get it ready to leaven a loaf. Here’s how:
Mix (3/8 cup) flour, (1/4 cup) warm water, (1/8 cup) starter in a small bowl. Let sit at room temperature (~70 degrees F) for 12 to 14 hours.
From Room Temp Starter
Take (1 tablespoon) of the starter, which will have begun to get lively, and mix it with (1/2 cup) flour and (1/4 cup) water.
Let it sit for 12 to 14 more hours. Now you’ll have just enough lively sourdough starter for a loaf (a little more than a half cup) plus a bit left over to begin the next batch of starter.
Now, get that next sourdough starter batch going: Scoop out about (1/8 cup) of the starter, and add (1 1/3 tablespoons) of flour and (1 1/3 tablespoons) of water. Mix it, and let sit for 3 hours at room temperature. Then store in the fridge, covered tightly. Keep it alive by baking every week; or feed it once a week by scooping out (1/8 cup) of starter (discarding the rest), and mixing with (1 1/3 tablespoons) of flour and (1 1/3 tablespoons) of water, as above.
How To Bake Sourdough Bread
Now, finally, make the bread:
Sourdough Bread Ingredients
(4 cups) whole wheat flour
(2 1/4 cups) water, at room temperature
(2 1/2 teaspoons) salt
(1/2 cup) Sourdough Starter
Step 1
This is known as the autolyse step. Mix the starter and water together in a large bowl or plastic bread-making tub. Add the flour, and mix well. Let sit 20 to 40 minutes.
Step 2
Mix dough by hand, squeezing and folding it to develop gluten.
Step 3
Let it rest, covered, for 3 hours, periodically folding as above (3 to 4 times).
Step 4
Shape the dough into a round by gently folding it over on itself, leaving a smooth, round top and a seamed bottom. This is known as a boule. Let it rest, covered, 20 minutes.
Step 5
Very gently place the boule, seam side up, into a floured proofing basket for 1.5 to 2 hours. If you do not have a proofing basket, you can take a linen (or fine mesh cotton, but linen is best) cloth, rub plenty of flour into it and place it in a small mixing bowl.

Make sure there is ample flour covering all surfaces that the dough will touch, and also be sure that the bowl is deep enough to really shore up the sides of the boule.
Step 6
About an hour into the proof, preheat the oven to 500 degrees and put the empty Dutch oven, with cover, into the oven, so that it will become blazing hot.
Very carefully, drop the boule into the hot Dutch oven, seam side down.
Make a few incisions along the top membrane about 1/4 inch into the dough’s surface, to help with the loaf expansion. I use a straight razor, a serrated knife works too.
Step 7
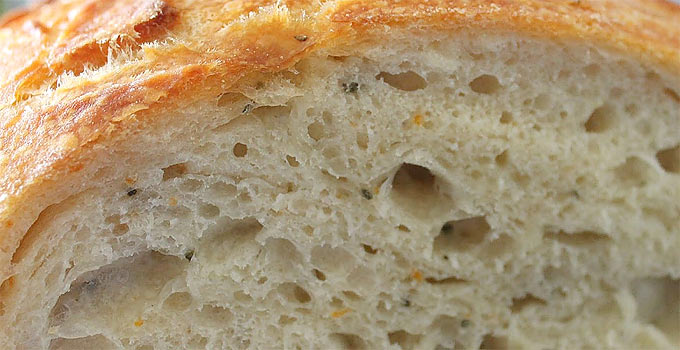
Bake approximately 30 minutes, then remove the lid of the Dutch oven and bake until the boule is a deep brown (10 to 15 minutes more). You can insert an instant-read thermometer into the loaf—when done, it will be within a few degrees of 212 F.
Step 8
Let cool on a metal rack—at least one hour; 4-6 hours is optimal to let the loaf develop flavor.
FEED THE SOURDOUGH STARTER
The starter keeps well in the fridge, feed it once a week or so by scooping out (1/8 cup) of starter (discarding the rest), and mixing with (1 1/3 tablespoons) of flour and (1 1/3 tablespoons) of water.
I make this whole wheat fresh ground. It is heavy. You can lighten it up some with store bought white flour. If you give it a nice warm place to rise and some time, whole wheat is fine.
There’s lot’s of ways to make sourdough. This one works and is pretty good.
The source of this sourdough starter recipe and instructions came from a MSB reader awhile ago. Thought I would format it and put it out there for your benefit.
Read more: THE Best Bread Machine For Bread Lover’s
Read more: How To Make Self Rising Flour & Biscuits Without Yeast
